Using a Delegated Certification Authority
You can run your own RPKI Certification Authority software instead of using the Hosted RPKI Certification Authority service provided by the RIPE NCC.
While the “hosted” service will be a good fit for most users as it takes away the operational burden of running an RPKI CA and repository, there are also use cases for running a “delegated” CA such as:
- Using one CA solution under multiple RIR/NIR parents
- Using one logical CA for managing multiple LIRs in one interface
- Sub-delegate a part of your resources to your own child CAs
There are currently two open-source RPKI CA software packages available:
- Krill by NLnet Labs
- RPKI Toolkit by Dragon Research Labs
On this page, you’ll learn how to set up Krill as a delegated CA, as it’s considered the most widely used solution. However, you can use the same steps in the setup of the RPKI Toolkit software, as both solutions rely on the same set of standards that define the exchange of identities and provisioning protocol.
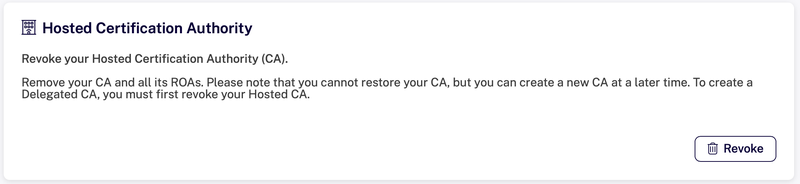
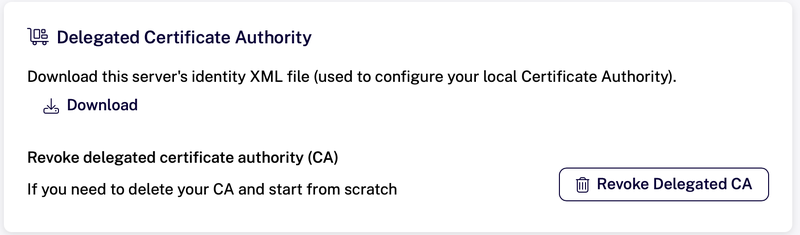
Revoke Hosted CA
If you are already using a Hosted CA, then you will need to revoke it before you can add a Delegated CA. In this case, you may want to try using a Delegated CA in the test environment before committing to doing this in production.
To revoke your Hosted CA, use the “Revoke” button in this section of the overview page.
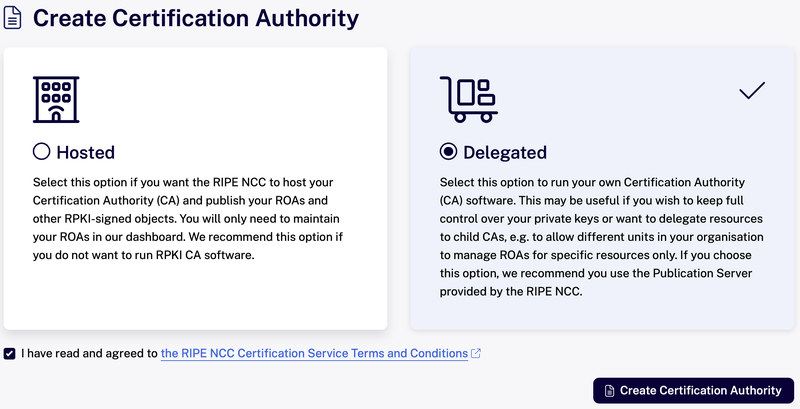
Creating a Delegated CA
To create a Delegated CA go to the RPKI Dashboard, select “Delegated" and click the “Create Certification Authority” button.
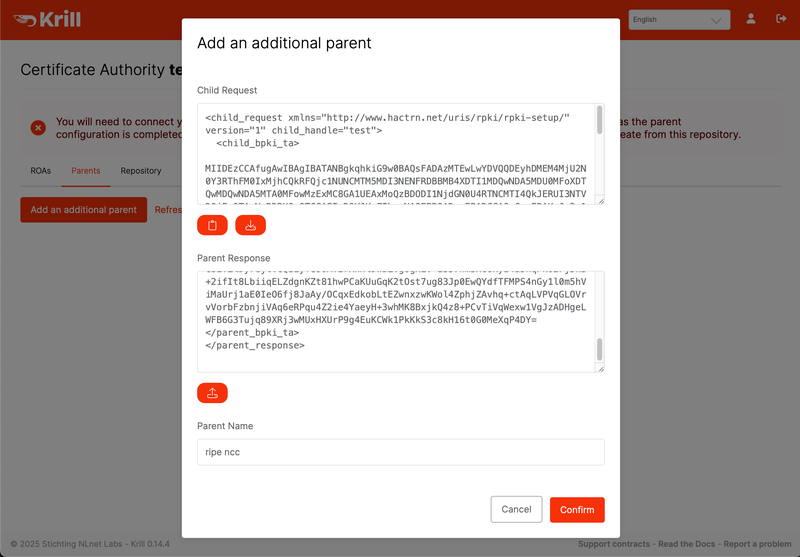
The next steps are necessary for the identity exchange between the delegated CA and the RIPE NCC CA.
This “Child Request” XML can be downloaded from the Krill UI in the “Parents” tab. You can download the file, or simply copy the XML to your clipboard.
Krill UI
RPKI Dashboard
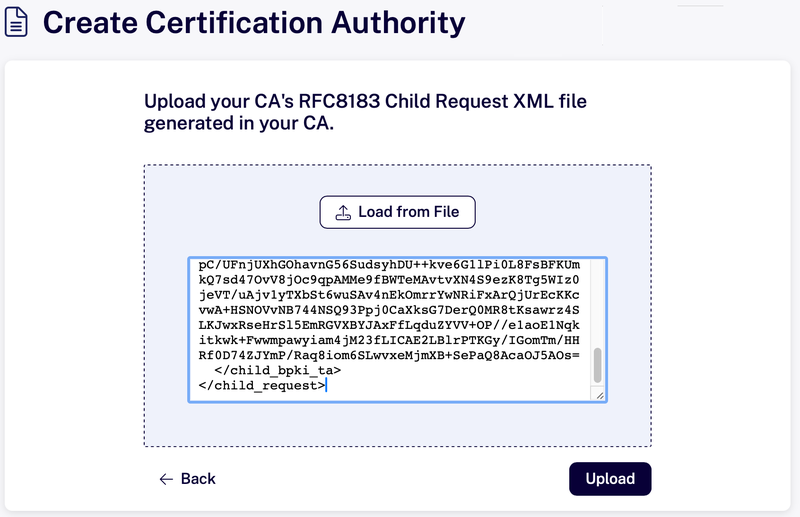
Paste the child request XML, or upload the file on the RPKI Dashboard.
After this step, find the Delegated Certificate Authority section on the overview page and download the server identity XML file. Note that after you click download, you will have the option to copy the XML onto your clipboard for easy pasting into the Krill UI next.
Afterwards, paste or upload this XML into your CA.

Setting Up Publication
After this step, your Delegated CA will be able to connect to the RIPE NCC as a parent CA. Before your CA can request a certificate, it will first need to have a Publication Server configured so that it will know which repository URIs to include in its Certificate Sign Requests. Thus, it will be able to publish its own content such as an RPKI manifest, CRL and ROAs.
There are two options:
- Run your Publication Server
- Use Publication as a Service provided by RIPE NCC
Note, that if you use Krill, you can migrate from one publication server to another later, using this process.
Run Your Own Publication Server
If you choose to run your own server using Krill, please check out the Krill documentation.
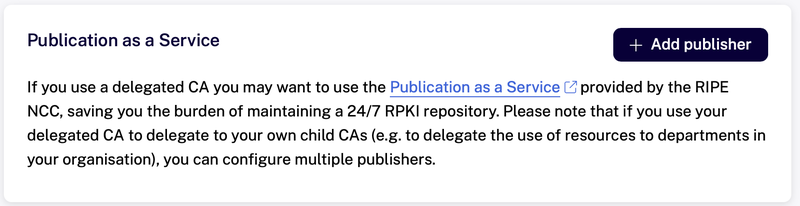
Publication as a Service
Alternatively, you can use the Publication as a Service provided by the RIPE NCC. In this case, the RIPE NCC will take care of the 24/7 availability of the repository, and your delegated CA can run and hold the private keys used for signing in your infrastructure.
Note that if your CA is unavailable for a short period, the availability and validity of your ROAs are not impacted as long as the repository is available, and your CA is restored in time for its manifest(s) and CRL(s) to be re-issued before they expire.
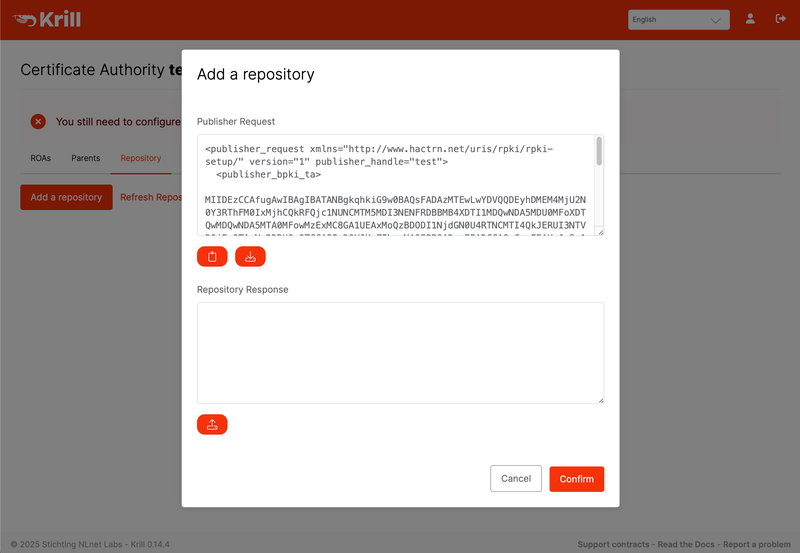
The process for this set-up publication is similar to setting up the provisioning protocol for your delegated CA as described above. First, you will need to get the “publisher request” XML. If you use Krill, you can find it under its Repository tab.
Next, find the following card on the RPKI Dashboard Overview page and click on the “Add publisher” button.
Upload or paste the publisher request, copy or download the repository response XML from the dashboard, and upload or paste that in your CA.
When this step is completed, your CA will be able to request certificates and start publishing ROAs.